Jeffrey Ng's Science e-Portfolio

Tuesday, 29 March 2011

9th Practical Lesson: 1P10 Brownian Motion

We also did another practical on the 29th of March as we were facing a lack of time and therefore, we did two practicals on the same day.


First, I will give a brief introduction of the Brownian Motion. It is named after the Scottish botanist Robert Brown who first observed it in 1827. He was using a microscope to look at pollen grains in water when he noticed that the grains kept moving about. At first he thought the pollen was alive but when he boiled it in water and tried again, the pollen grains still moved and Brown was unable to explain it. This was how the Brownian Motion came about.


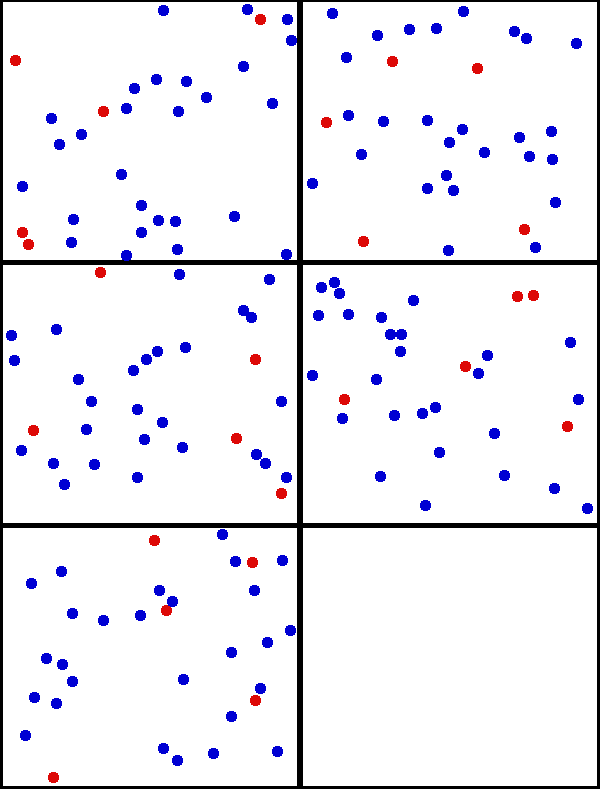
This time, due to time constraints, we could not perform the experiment ourselves but the teacher will give a demonstration. Our teacher, Mr Low showed us the Brownian Motion using the projector. the Brownian Motion was shown using smoke put in a smoke cell and with bright light shone through the smoke cell and viewed under a microscope, the smoke particles could be seen as white dots moving about in constant random motion.


What exactly causes the bright spots or smoke particles to move then? This is because the air particles which cannot be seen bombard unevenly on all sides of the smoke particles, causing the random and constant motion. 


What about if the temperature of the smoke cell is increased? That will cause the smoke particles or bright spots to move faster as there is more kinetic energy due to higher temperature. Also, how can we differentiate between the larger or the smaller particles? We can differentiate them due to the fact that larger particles move around slower compared to smaller particles.


Another parallel of the experiment is to suspend pollen grains or talcum powder in water and observe the movements under a light source or a powerful microscope.


I have learnt a lot on the topic of Brownian Motion and how it occurs today and I hope that there can be more of such experiments where we can come into contact with such natural phenomenon.
8th Practical Lesson: 1P9 Density of an Irregular Object

Yay, yet another exciting science practical lesson and today, we will be exploring how to find the density of an irregular solid! B)

First, we had to listen to our LSS teacher, Mr Low, who gave us instructions on how to perform the experiment. We listened attentively and gathered the necessary apparatus for the experiment:
  1. Measuring cylinder
  2. Tissue paper
  3. Electronic beam balance
  4. A glass stopper
  5. String
  6. Scissors
Next, we had to follow the procedures and make sure that the experiment runs smoothly. Firstly, we had to weigh the glass stopper to determine its mass, M. Next,we need to pour water into the measuring cylinder to about one-third of its depth. Then, we have to note the volume reading, V1.


The following step is to tie the glass stopper with a piece of string and lower it gently into the water and not its volume reading V2. Therefore, the volume of the glass stopper is equal to (V2 - V1). After that, we also have to repeat the experiment with different starting volumes.


We had to plot our results into a table and compare the results of the few experiments we have conducted with different volumes. By recording the answers on a table, we can easily compare the volume of the glass stopper and confirm if the glass stopper is really the volume which we measured in the 1st experiment or are there some mistakes which will be identified by comparing the results of the 3 experiments.


Also, we had to find the density of the glass stopper which was the formula we learned the previous practical, finding the density can be represented like this:
This is the formula in which we use to calculate density and we found that the density of our glass stopper is 2250kg/cubic metre. We also learnt about the 2 precautions when handling a measuring cylinder which is crucial for us to use a measuring cylinder properly.

There were also some questions for us to answer and they needed for you to apply the concept of density so that you can get the answer.

This Science Practical lesson was quite enriching and I look forward to the next Science Practical lesson. :D


Tuesday, 22 March 2011

7th Practical Lesson: 1P8 Density of a Regular Solid

Another practical lesson and today, we will be finding out how to calculate the density of a regular solid.

As usual, we had to gather our apparatus first:

  1. Micrometer screw gauge
  2. Electronic beam balance
  3. Small plastic bottle
  4. 5 glass marbles
Next, we had to read the instructions and follow them carefully. We had to weigh the plastic bottle first to determine its mass, m1. Then, we had to place all 5 marbles into the plastic bottle and weigh again, recording the mass as m2. Lastly, we had to measure the diameter of one of the glass marbles from 2 different positions using the micrometer screw gauge. We recorded our findings onto the worksheet and from there, we subtracted m1 from m2 and got the mass of the marbles. To find the volume of the marble, we must apply the formula for finding the volume of a sphere:

We used this formula and found the volume of 1 marble. Next, we divided the mass of the marble with the volume of a marble to find density.

With that, we could find the density of a marble.

I learnt quite a few things in this practical, and that includes the formula of volume of spheres and also the formula to calculate density. I still have a lot to learn and I look forward to the next Science Practical lesson.


Friday, 18 March 2011

Naked Number Catastrophe

I was doing some IT work for my Science lesson when I came across this article:


After a nine month trip to Mars, the Mars Climate Observer spacecraft was lost as a result of Naked Numbers.  Numbers communicated from Lockheed Martin in Colorado to NASA's Jet Propulsion Lab in California were left unit-less.  Naked numbers, being completely meaningless, left engineers to guess at their meaning.  The confusion created by improperly dressed numbers caused the loss of a $125 million spacecraft and the waste of a 9 month journey to Mars.  Thankfully, no lives were lost.

Lockheed Martin was sending daily course adjustments to the Jet Propulsion Laboratory with numbers that should have been wearing the English units of "pound-seconds" to describe the amount of impulse which should be applied to the spacecraft to adjust its course.  When these naked numbers arrived at the Jet Propulsion Laboratory engineers assumed that these were specifying the amount of impulse in metric units of "newton-seconds".  Simply labeling the units that were being used would have prevented this tremendous loss.  A group of physics teachers in Ithaca, New York hope to bring a proposal to Capitol Hill that would ban the use of naked numbers in the United States.  Further efforts are being used to convince the United Nations to apply a similar law to the World.  Until such a law is passed, physics teachers everywhere will have to settle for simply marking answers as wrong if they are not labeled with proper units.  Math teachers are urged to contribute to the solution not the problem.
 This article I found interesting as it applies to our daily lives as well. When we are doing our problem sums for mathematics everyday, we have to remember to write down units. The importance of these units are demonstrated in this article above. Without this units, we will not be able to accurately comprehend and do things. Only with this units can we function properly and base our calculations and finding on these units.


Due to the fact that we in Singapore are not using "Naked" numbers, and we are forced to write down the units, after some time, you will find that it has become a habit and you will not find it troublesome to write down units which many have as a misconception of a waste of time. I think that these units can make a very big difference as it may make a difference between life and death in certain situations.


I hope that one day, these numbers will be "dressed up" properly with the units required and I think it is time we start not to take units for granted! :D


Wednesday, 2 March 2011

6th Practical Lesson: 1P7 Measurement of Time - Pendulum

Today, we had another Science Practical lesson and I could say that I learnt quite a bit from this practical.


First, we started off as usual with gathering our apparatus: 

  1. 120 cm thread
  2. Pendulum bob
  3. Meter rule
  4. Split cork
  5. Stopwatch
  6. Clamps retort stand
Next, we had to read the instructions and follow them to make sure that nothing wrong happens. We had to fix one end of the bob, clamp the other end and firmly between the split cork, making pendulum of length 100 cm. We then had to give the bob a small displacement of about 10 degrees and set it into oscillation. We had to time the period of each oscillation using a stopwatch.

The next experiment was to decrease the length of the string holding the bob by 10 cm each time and observe if there were any differences. The period for 10 oscillations with the decreased length was shorter of course and we had to record our readings down.


After that, we had to plot a graph observing the timing of the periods with the decreasing length.


From this experiment, I learnt quite a few terms like oscillation, period and also tried a split cork for the first time. This Practical lesson was quite interesting and it taught me much too. I am looking forward to the next practical lesson!