Jeffrey Ng's Science e-Portfolio

Tuesday, 29 March 2011

8th Practical Lesson: 1P9 Density of an Irregular Object

Yay, yet another exciting science practical lesson and today, we will be exploring how to find the density of an irregular solid! B)

First, we had to listen to our LSS teacher, Mr Low, who gave us instructions on how to perform the experiment. We listened attentively and gathered the necessary apparatus for the experiment:
  1. Measuring cylinder
  2. Tissue paper
  3. Electronic beam balance
  4. A glass stopper
  5. String
  6. Scissors
Next, we had to follow the procedures and make sure that the experiment runs smoothly. Firstly, we had to weigh the glass stopper to determine its mass, M. Next,we need to pour water into the measuring cylinder to about one-third of its depth. Then, we have to note the volume reading, V1.


The following step is to tie the glass stopper with a piece of string and lower it gently into the water and not its volume reading V2. Therefore, the volume of the glass stopper is equal to (V2 - V1). After that, we also have to repeat the experiment with different starting volumes.


We had to plot our results into a table and compare the results of the few experiments we have conducted with different volumes. By recording the answers on a table, we can easily compare the volume of the glass stopper and confirm if the glass stopper is really the volume which we measured in the 1st experiment or are there some mistakes which will be identified by comparing the results of the 3 experiments.


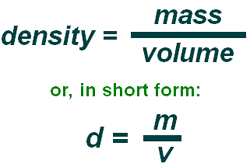
Also, we had to find the density of the glass stopper which was the formula we learned the previous practical, finding the density can be represented like this:
This is the formula in which we use to calculate density and we found that the density of our glass stopper is 2250kg/cubic metre. We also learnt about the 2 precautions when handling a measuring cylinder which is crucial for us to use a measuring cylinder properly.

There were also some questions for us to answer and they needed for you to apply the concept of density so that you can get the answer.

This Science Practical lesson was quite enriching and I look forward to the next Science Practical lesson. :D


Tuesday, 22 March 2011

7th Practical Lesson: 1P8 Density of a Regular Solid

Another practical lesson and today, we will be finding out how to calculate the density of a regular solid.

As usual, we had to gather our apparatus first:

  1. Micrometer screw gauge
  2. Electronic beam balance
  3. Small plastic bottle
  4. 5 glass marbles
Next, we had to read the instructions and follow them carefully. We had to weigh the plastic bottle first to determine its mass, m1. Then, we had to place all 5 marbles into the plastic bottle and weigh again, recording the mass as m2. Lastly, we had to measure the diameter of one of the glass marbles from 2 different positions using the micrometer screw gauge. We recorded our findings onto the worksheet and from there, we subtracted m1 from m2 and got the mass of the marbles. To find the volume of the marble, we must apply the formula for finding the volume of a sphere:

We used this formula and found the volume of 1 marble. Next, we divided the mass of the marble with the volume of a marble to find density.

With that, we could find the density of a marble.

I learnt quite a few things in this practical, and that includes the formula of volume of spheres and also the formula to calculate density. I still have a lot to learn and I look forward to the next Science Practical lesson.


Friday, 18 March 2011

Naked Number Catastrophe

I was doing some IT work for my Science lesson when I came across this article:


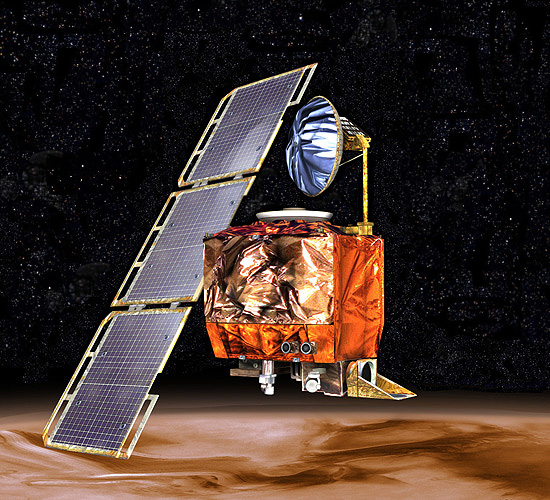
After a nine month trip to Mars, the Mars Climate Observer spacecraft was lost as a result of Naked Numbers.  Numbers communicated from Lockheed Martin in Colorado to NASA's Jet Propulsion Lab in California were left unit-less.  Naked numbers, being completely meaningless, left engineers to guess at their meaning.  The confusion created by improperly dressed numbers caused the loss of a $125 million spacecraft and the waste of a 9 month journey to Mars.  Thankfully, no lives were lost.

Lockheed Martin was sending daily course adjustments to the Jet Propulsion Laboratory with numbers that should have been wearing the English units of "pound-seconds" to describe the amount of impulse which should be applied to the spacecraft to adjust its course.  When these naked numbers arrived at the Jet Propulsion Laboratory engineers assumed that these were specifying the amount of impulse in metric units of "newton-seconds".  Simply labeling the units that were being used would have prevented this tremendous loss.  A group of physics teachers in Ithaca, New York hope to bring a proposal to Capitol Hill that would ban the use of naked numbers in the United States.  Further efforts are being used to convince the United Nations to apply a similar law to the World.  Until such a law is passed, physics teachers everywhere will have to settle for simply marking answers as wrong if they are not labeled with proper units.  Math teachers are urged to contribute to the solution not the problem.
 This article I found interesting as it applies to our daily lives as well. When we are doing our problem sums for mathematics everyday, we have to remember to write down units. The importance of these units are demonstrated in this article above. Without this units, we will not be able to accurately comprehend and do things. Only with this units can we function properly and base our calculations and finding on these units.


Due to the fact that we in Singapore are not using "Naked" numbers, and we are forced to write down the units, after some time, you will find that it has become a habit and you will not find it troublesome to write down units which many have as a misconception of a waste of time. I think that these units can make a very big difference as it may make a difference between life and death in certain situations.


I hope that one day, these numbers will be "dressed up" properly with the units required and I think it is time we start not to take units for granted! :D


Wednesday, 2 March 2011

6th Practical Lesson: 1P7 Measurement of Time - Pendulum

Today, we had another Science Practical lesson and I could say that I learnt quite a bit from this practical.


First, we started off as usual with gathering our apparatus: 

  1. 120 cm thread
  2. Pendulum bob
  3. Meter rule
  4. Split cork
  5. Stopwatch
  6. Clamps retort stand
Next, we had to read the instructions and follow them to make sure that nothing wrong happens. We had to fix one end of the bob, clamp the other end and firmly between the split cork, making pendulum of length 100 cm. We then had to give the bob a small displacement of about 10 degrees and set it into oscillation. We had to time the period of each oscillation using a stopwatch.

The next experiment was to decrease the length of the string holding the bob by 10 cm each time and observe if there were any differences. The period for 10 oscillations with the decreased length was shorter of course and we had to record our readings down.


After that, we had to plot a graph observing the timing of the periods with the decreasing length.


From this experiment, I learnt quite a few terms like oscillation, period and also tried a split cork for the first time. This Practical lesson was quite interesting and it taught me much too. I am looking forward to the next practical lesson!


Monday, 28 February 2011

Term 1 Test Reflections

The term 1 test results are out and sadly, the results are not as good as I expected.

This time, I got 27.5/40 for my Science test. This was a B3 and it was not a very good start for the year's tests. That score was just half a mark away from an A2 but I don't think I deserved an A2.

In this test, I did fairly well for the MCQ section, scoring 12/15. My score should have been 14/15 but due to the fact that I inverted the answers for Q1 and Q2, which was supposed to be 'D' and 'A' respectively but I put it as 'A' and 'D' respectively instead. This was an extremely careless mistake on my part otherwise I could have gotten better grades.

Also, I did not study in detail for this test, resulting in this kind of results. I did not do well for Section B, especially the question which required us to draw a graph. Not being very clear on how to draw a graph, I got the whole question wrong!! This was a mistake not to be made on my part.

For my next test, I indeed have to study harder and score better grades so time to study!!


Wednesday, 16 February 2011

5th Practical Lesson: 1P6 Measurement of Length

16/2/11
Another practical lesson as usual and this time, it was about the measurement of length. I know, I know the topic sounds boring and old and you were willing to bet that it involved a meter rule. Well, you were right but that was not all we used...We also used the two tools seen. They are the vernier calipers and the micrometer screw gauge.


First, We started off with gathering our apparatus. Namely:

  1. Meter rule
  2. Vernier Calipers
  3. Micrometer screw gauge
  4. Small beaker (50ml)
  5. Ball bearing
  6. Short piece of thick wire
With this done, we then proceeded on to conducting the procedure itself. We were first supposed to examine the meter rule and find its smallest reading. After that, we were tasked to find the height of our seat from 4 different positions and then find the average height itself. 


The next experiment was to get the vernier calipers and check for the smallest reading and also the zero error of the vernier calipers. This is to make sure that we do not have any mistakes in our measurements. Next, we had to measure the internal diameter of the beaker at 3 different positions, likewise for the external diameter. We then compiled the data into a table where the results could be seen and a conclusion could be made easily.


Next was the experiment using a micrometer screw gauge. We had to use the micrometer screw gauge to measure the diameters of the wire and the ball bearing. We had to repeat the measuring 3 times. From there, we could get the average results and also make a conclusion from there.


The next step was to compare our findings with our hypotheses. In this experiment, there was no hypotheses to make as there was no question to answer. 


That step unnecessary, we proceeded to answer some questions posed by our teacher. The first question was to ask what instruments we would use to measure accurately the diameter and thickness of the coin. Next question came the one where we had to apply the knowledge and use it to create a procedure to measure the diameter of a long piece of wire without using a micrometer screw gauge.


Answer: 


     "Wrap the long wire along the length of the glass rod making sure that there are no gaps in between each turn. Count the number of turns along the length of the glass rod. Measure the length of the glass rod. Measure the length of the glass rod with the meter rule. Divide the length of the glass rod by the number of turns of the long wire along the glass rod. The thickness and the diameter can thus be obtained."


This answer was not what I expected it to be and the question expected us to think out of the box in order to find a solution for the problem.


This practical was fun and interesting and it taught me a lot more about what we can think about to solve problems.


Wednesday, 2 February 2011

4th Practical Lesson: 1P5 Observations and Recording Part 2

2/2/11
Yet another practical lesson which we looked forward to. Today, we would be continue from where we left off from last week. We would be doing experiments and of course observing and recording the results. The first experiment was to use the thermometer and we were all excited and eager to get on with it.
Of course being as I was, a cautious person, I awaited instructions from my LSS teacher, Mr Low, who was back from re-service. He gave us instructions on what to do for the experiment and some things to take note of.We were to set up an experiment to heat water.
We then had to record our findings in a table so as to compile the information and then we can look through and analyse the data more easily. Also, we can make a conclusion from the data and prove if our hypotheses is right. In the end, I came up with a graph and proved my hypotheses of there being impurities in the water resulting in the temperature of the water rising to 101.5 degrees Celsius before remaining constant, signifying that 101.5 degrees Celsius is its boiling point.

We had to draw a best fit graph and I am not very skillful at drawing graphs, thus I may have to practise more. I still think that the water from the tap, is still clean but is "dirty" to some extent. This is due to the fact that there are some minerals present in the water. Maybe I could find out how this water is purified. I am looking forward to the next practical lesson!


Wednesday, 26 January 2011

3rd Practical Lesson: 1P4 Observations and Recording Part 1

Yay!

It was yet another practical lesson that we all looked forward to. I really hope every science lesson was practical. :P Anyway, this time, we can really start doing experiments by ourselves. We started with the mixing of chemicals. We started by putting vinegar into a clean test tube to a depth of about 1cm. Next, we added a spatula of sodium bicarbonate. This resulted in.........
That was very cool and exciting. This made me even more interested to know what the rest of the lesson was about. We also did a few other experiments dealing with certain chemicals and of course we had to take note of certain precautions. We also put methylated spirits onto the back of our hands and when we blew gently across the back of our hands, the methylated spirits evaporated and my hand felt cooling. I understood that the methylated spirits evaporated quickly but were they considered a kind of alcohol? I guess I will have to find out more on that.


The creature drawn by me!(SO CUTE right?)

We did a few other experiments such as adding iodine solution to a starch suspension. Even though we know in theory that it will produce a dark blue solution, seeing it in real life makes it more REAL. ;)


Through this practical session, I have understood the importance of observation in Science. Not only do we have to observe, we also have to record the results so as to compare it with our hypothesis which we were suppose to have before the experiment.


Wednesday, 19 January 2011

2nd Practical Lesson: 1P2,1P3 Using the Bunsen Burner, Types of Flames

19/1/11
Today was our second practical lesson and it was also taken by Mr Ong as our LSS teacher, Mr Low will be away for 3 weeks of NS. We stepped into the lab and eagerly awaited instructions from Mr Ong on what to do for that practical lesson. We were then introduced to the Bunsen Burner. Although I have heard of it before, but I have never used 1 before. However, there were safety precautions to take note of when handling a Bunsen Burner.
Look at this video to get a brief idea on what a bunsen burner is and how to operate it. There are different parts to a bunsen burner and we have to be familiar with it to operate the bunsen burner well and fast.


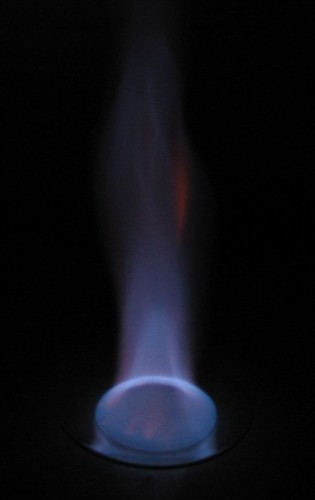
We also had a chance to operate the bunsen burner at last! I followed the procedures with my partner and we managed to light the bunsen burner and we were tasked to observe the flame of the bunsen burner.We observed that with the air hole closed, there is a luminous flame, but when the air hole was open, a non-luminous flame could be seen. The luminous flame was observed to be less steady and is constantly flickering but is also visible clearly to us. The non-luminous flame though was steady and had a blue cone shaped flame.


The worksheet also wanted us to stand ten steps away from the flame and see if we still can see the flame. Even though I can clearly see both flames, the answer was meant to be that the luminous flame was visible but not the non-luminous flame. I understand the reasoning behind this but actually, I could see the non-luminous flame better than the luminous flame. :P


We were also given the opportunity to heat a test tube and we had to take note of a lot of precautions such as not pointing the mouth of the test tube at anyone when heating. It was certainly fun but I felt that to a certain extent, it would be dangerous if we abused it. For example, one of my classmates caused a strike back. XD He was not careful with using the equipment, causing that to happen. I am sure there will still be lots more exciting practicals coming up! :D
A comparison of the 2 types of flames

Wednesday, 12 January 2011

1st Practical Lesson: 1P1 Getting to Know the Science Laboratory

12/1/2011
Today was the first day of our science lessons and but our LSS teacher is not here as he was away for National Service. Our class was taken over by a relief teacher, Mr Ong. We were taken to the science laboratory and for me it was my 2nd time in a science lab. It was an interesting place but there were many rules to conform by and they had to be followed strictly or it will be dangerous for us. Mr Ong started off by describing the many items and places around the lab which we need to know and also went through with us some things we need to take note off when using certain items. He also briefly talked about some of the functions of the objects in the lab.


Mr Ong also introduced us to different sorts of symbols which represents hazards. Of course we had to remember these symbols as they will appear on some of the equipment in the lab. He also told us some of the things to take note of when drawing the diagrams.


This was our first Science Practical lesson and I found it fun and interesting. The lab had a smell though XD


What is Science???

Many ask, what exactly is Science? Is it simply a subject we study in school or is it much more than that? Is it the truth of the universe, the ultimate truth? I believe at least what I believe is that science is the gathering of knowledge and from this pool of knowledge we will apply the necessary knowledge to solve a problem or find a problem and then solve it.


These two videos will show what some scientists think is science and what other people think science really is.

Enjoy!! :)

Overview of what will be in my Science e-Portfolio

Hi there, 

This is my Science e-Portfolio and also my first blog so forgive me for a few technical errors if there are any. So what I will be covering in my Science e-Portfolio are my:
  • Reflections on test results
  • Practical lessons
  • Science as a whole
  • My ACE assignments
  • and other objectives which I hope to achieve through this e-Portfolio
Hope you have a fun time reading my blog! :D

Look out for more updates and have FUN!! :)