Jeffrey Ng's Science e-Portfolio

Thursday, 25 August 2011

Term 3 Science ACE #2

Stem Cells

What are Stem Cells?
Stem cells are biological cells found in all multi-cellular organisms, that can divide through mitosis and differentiate into diverse specialized cell types and can self renew to produce more stem cells.

What can Stem Cells do?
Stem cells have the remarkable potential to develop into many different cell types in the body during early life and growth. In addition, in many tissues they serve as a sort of internal repair system, dividing essentially without limit to replenish other cells as long as the person or animal is still alive. In mammals, there are two broad types of stem cells: embryonic stem cells that are isolated from the inner cell mass of blastocysts, and adult stem cells that are found in various tissues. In adult organisms, stem cells and progenitor cells act as a repair system for the body, replenishing adult tissues. In a developing embryo, stem cells can differentiate into all the specialized cells, but also maintain the normal turnover of regenerative organs, such as blood, skin, or intestinal tissues.
How can Stem Cells be obtained?
Stem cells can now be artificially grown and transformed into specialized cell types with characteristics consistent with cells of various tissues such as muscles or nerves through cell culture. Highly plastic adult stem cells are routinely used in medical therapies. Stem cells can be taken from a variety of sources, including umbilical cord blood and bone marrow. Embryonic cell lines and autologous embryonic stem cells generated through therapeutic cloning have also been proposed as promising candidates for future therapies. Research into stem cells grew out of findings by Ernest A. McCullochand James E. Till at the University of Toronto in the 1960s.

The classical definition of a stem cell requires that it possess two properties:
§  Self-renewal - the ability to go through numerous cycles of cell division while maintaining the undifferentiated state.
§  Potency - the capacity to differentiate into specialized cell types. In the strictest sense, this requires stem cells to be either totipotent or pluripotent - to be able to give rise to any mature cell type, although multipotent or unipotent progenitor cells are sometimes referred to as stem cells.

In other organs, however, such as the pancreas and the heart, stem cells only divide under special conditions.

What are some recent discoveries with stem cells?
Until recently, scientists primarily worked with two kinds of stem cells from animals and humans: embryonic stem cells and non-embryonic "somatic" or "adult" stem cells. The functions and characteristics of these cells will be explained in this document. Scientists discovered ways to derive embryonic stem cells from early mouse embryos nearly 30 years ago, in 1981. The detailed study of the biology of mouse stem cells led to the discovery, in 1998, of a method to derive stem cells from human embryos and grow the cells in the laboratory. These cells are called human embryonic stem cells. The embryos used in these studies were created for reproductive purposes through in vitrofertilization procedures. When they were no longer needed for that purpose, they were donated for research with the informed consent of the donor. In 2006, researchers made another breakthrough by identifying conditions that would allow some specialized adult cells to be "reprogrammed" genetically to assume a stem cell-like state. This new type of stem cell, called induced pluripotent stem cells (iPSCs), will be discussed in a later section of this document.
Stem cells are important for living organisms for many reasons. In the 3- to 5-day-old embryo, called a blastocyst, the inner cells give rise to the entire body of the organism, including all of the many specialized cell types and organs such as the heart, lung, skin, sperm, eggs and other tissues. In some adult tissues, such as bone marrow, muscle, and brain, discrete populations of adult stem cells generate replacements for cells that are lost through normal wear and tear, injury, or disease.

Miracle Cells?
Given their unique regenerative abilities, stem cells offer new potentials for treating diseases such as diabetes, and heart disease. However, much work remains to be done in the laboratory and the clinic to understand how to use these cells for cell-based therapies to treat disease, which is also referred to as regenerative or reparative medicine.
Laboratory studies of stem cells enable scientists to learn about the cells’ essential properties and what makes them different from specialized cell types. Scientists are already using stem cells in the laboratory to screen new drugs and to develop model systems to study normal growth and identify the causes of birth defects.
Ending off
Research on stem cells continues to advance knowledge about how an organism develops from a single cell and how healthy cells replace damaged cells in adult organisms. Stem cell research is one of the most fascinating areas of contemporary biology, but, as with many expanding fields of scientific inquiry, research on stem cells raises scientific questions as rapidly as it generates new discoveries.

Term 3 ACE #1

Reverse Osmosis
What is Reverse Osmosis?
Reverse osmosis is a filtration method that removes many types of large molecules and ions from solutions by applying pressure to the solution when it is on one side of a selective membrane. The result is that the solute is retained on the pressurized side of the membrane and the pure solvent is allowed to pass to the other side. To be "selective," this membrane should not allow large molecules or ions through the pores (holes), but should allow smaller components of the solution (such as the solvent) to pass freely and trap the solute on the other side.
In the normal osmosis process the solvent naturally moves from an area of low solute concentration, through a membrane, to an area of high solute concentration. The movement of a pure solvent to equalize solute concentrations on each side of a membrane generates a pressure and this is the "osmotic pressure." Applying an external pressure to reverse the natural flow of pure solvent, thus, is reverse osmosis. The process is similar to membrane filtration. However, there are key differences between reverse osmosis and filtration. The predominant removal mechanism in membrane filtration is straining, or size exclusion, so the process can theoretically achieve perfect exclusion of particles regardless of operational parameters such as influent pressure and concentration. Reverse osmosis, however, involves a diffusive mechanism so that separation efficiency is dependent on solute concentration, pressure, and water flux rate. Reverse osmosis is most commonly known for its use in drinking water purification from seawater, removing the salt and other substances from the water molecules.
History
The process of osmosis through semi-permeable membranes was first observed in 1748 by Jean Antoine Nollet. For the following 200 years, osmosis was only a phenomenon observed in the laboratory. In 1949, the University of California at Los Angeles (UCLA) first investigated desalination of seawater using semi-permeable membranes. Researchers from both UCLA and the University of Florida successfully produced fresh water from seawater in the mid-1950s, but the flux was too low to be commercially viable. By the end of 2001, about 15,200 desalination plants were in operation or in the planning stages worldwide.

How does Reverse Osmosis work?

To understand "reverse osmosis," it is probably best to start with normal osmosis.
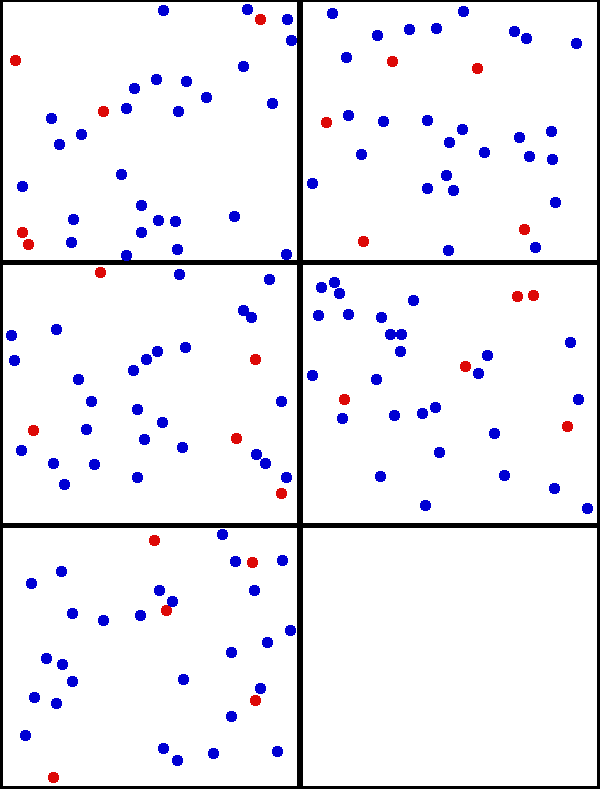
On the left is a beaker filled with water, and a tube has been half-submerged in the water. As you would expect, the water level in the tube is the same as the water level in the beaker. In the middle figure, the end of the tube has been sealed with a "semi-permeable membrane" and the tube has been half-filled with a salty solution and submerged. Initially, the level of the salt solution and the water are equal, but over time, something unexpected happens -- the water in the tube actually rises. The rise is attributed to "osmotic pressure."
A semi-permeable membrane is a membrane that will pass some atoms or molecules but not others. Saran wrap is a membrane, but it is impermeable to almost everything we commonly throw at it. The best common example of a semi-permeable membrane would be the lining of your intestines, or a cell wall. Gore-tex is another common semi-permeable membrane. Gore-tex fabric contains an extremely thin plastic film into which billions of small pores have been cut. The pores are big enough to let water vapour through, but small enough to prevent liquid water from passing.
In the figure above, the membrane allows passage of water molecules but not salt molecules. One way to understand osmotic pressure would be to think of the water molecules on both sides of the membrane. They are in constant Brownian motion. On the salty side, some of the pores get plugged with salt atoms, but on the pure-water side that does not happen. Therefore, more water passes from the pure-water side to the salty side, as there are more pores on the pure-water side for the water molecules to pass through. The water on the salty side rises until one of two things occurs:
  • The salt concentration becomes the same on both sides of the membrane (which isn't going to happen in this case since there is pure water on one side and salty water on the other).
  • The water pressure rises as the height of the column of salty water rises, until it is equal to the osmotic pressure. At that point, osmosis will stop.

In reverse osmosis, the idea is to use the membrane to act like an extremely fine filter to create drinkable water from salty (or otherwise contaminated) water. The salty water is put on one side of the membrane and pressure is applied to stop, and then reverse, the osmotic process. It generally takes a lot of pressure and is fairly slow, but it works. 

View the Prezi created at http://prezi.com/hb5syxeqxhdj/reverse-osmosis/

Friday, 12 August 2011

Term 3 Test Reflections

Our Term 3 Science test was finally returned to us and I managed to obtain a score of 36.5/40 which was quite an impressive score for me. I guess I was able to achieve such a score this time was due to the fact that I studied through the necessary topics for the test and made it a point to remember the important facts and keywords to put in my answers. The test was not very hard but it reflected well on whether we had listened and absorbed anything in our practicals and theory lessons. In this test, I did well in the areas pertaining more to the periodic table. I feel that I did study enough off the periodic table to understand that if the elements are put in the same column, the have similar chemical properties. And also, after getting many questions on compounds and mixtures wrong, I have finally come to my senses and got them right in this test. And the last question of the test was also pretty easy as a similar question has also come out in our practices before. I hope I can continue like this and hopefully improve from these results.

Thursday, 5 May 2011

Term 2 Test Reflections

For this test, I felt that I was better prepared and that I had more confidence in answering the questions for the test. For this test, my target was 33/40 due to the fact that I did not score very well in my previous test but it exceeded my expectations and I surprisingly got 35.5/40 for my Term 2 test. Why I could get so high was not really a mystery as I knew myself that I tried my best and revised for the test and reviewed my notes on a daily basis, thus the improvement in my results. My target for next term will probably be 36 and I hope to be able to achieve it!


Tuesday, 26 April 2011

12th Practical Lesson: 1P13 Which can Dissolve More?

Yet another practical lesson and this time, the title of the practical was intriguing, thus we were quite excited to find out more. That day, when we entered the lab, I found that the class was less noisy than usual and I knew they wanted to know more about this practical. As a result, we could get started with this  practical lesson quickly. First, of course there were precautions for us to take and instructions for us to follow and we had to listen carefully to our Science teacher, Mr Low who was explaining some concepts first before starting us on the experiments.


What do we aim to achieve in this practical then? We hope to find out the solubility of different solutes differ in the same solvent. So some food for though before we start, controlling variables. We needed to know how to control variables to start with this experiment. So, controlling variables is to change only 1 variable at a time and keep the other variables constant to ensure a fair test. In this experiment, since we want to find out the solubility of different solutes, the factor or variables we must change is the type of solvent.


What about the other factors to be kept constant? They include:

  1. Type of solvent
  2. Mass of solute
  3. Volume of solute
  4. Temperature of solvent
The procedures we need to follow? Well, firstly, we had to measure 20cm³of water, then we had to weigh 1g of common salt using the electronic beam balance and add the common salt to the water. Next, we have to stir and dissolve the common salt in water. If it dissolves, completely, we have to weigh another 1g of salt and add it to the water. We have to continue adding the water until no more of such salt will dissolve anymore. We also have to repeat the following steps with baking soda and iodine crystals.

After the whole experiment, we had to tabulate our results in a table with the type of solute and the maximum amount of it dissolved/g.

So what can we conclude from the above results? We can conclude that of the 3 solutes tested, common salt is the most soluble in water and iodine crystals are the least soluble in water. Thus, different solutes have different solubility in the same solvent. How will I improve the experiment if I could? I will measure the solutes in smaller amounts so that I can get more accurate results.

The next practical lesson will be in the end of June as there are other activities on this day for the following weeks and I will miss the lab dearly. :D

Tuesday, 19 April 2011

11th Practical Lesson: 1P12 Forming Compounds

We had this practical lesson on the same day as 1P11 but I did not have space to put it in my previous post. We had to cram two practicals in the same day and it was quite a mad rush. As usual, we had to gather our materials first:

  1. Magnesium ribbon
  2. Iron fillings
  3. Dilute sulfuric acid
  4. Lead (II) nitrate solution
  5. Sodium chloride
Our apparatus include: test tubes, Bunsen burner, evaporating dish, test tube holder and a pair of tongs. There were some things that were aimed to achieve at the end of the practical and we had to take note of them. It was to investigate the formation of these compounds by:

  1. Reacting two elements
  2. Reacting an element and a compound
  3. Reacting two compound
With these aims clear in our minds, we started our experiment. Our first experiment was to hold a magnesium ribbon with a pair of tongs, place it in the Bunsen flame and when the magnesium ribbon catches fire, hold the pair of tongs above the evaporating dish to collect the ashes formed. So what do we see? We see that the ribbon starts to burn and gives off a bright light. This is the natural chemical reaction when magnesium comes into contact with fire. We also had to observe the ashes which were flaky and white in colour after it was burnt.


Next, we had to answer a question on the whether due to the Bunsen flame, a new substance has formed and why it has occurred. My answer was as follows:
Yes. Oxygen has reacted with magnesium under higher temperature and also due to the heat it has broken the chemical bonds between the magnesium ribbon and also, the appearances of the magnesium ribbon has totally changed.
This means that oxygen has reacted with magnesium to create magnesium oxide, the white substance formed. :O

How about reacting an element with a compound? Well, our next experiment tells us more. First, we had to place half a spatula of iron fillings in a test-tube. Next, we had to add dilute sulfuric acid to a depth of about 2 cm and record our observations. My observation was that the mixture started to bubble and there were bubbles of colourless gas rising from the iron fillings. So did it change into a new substance and why so? Well, it has indeed changed into a new substance and of course, the reason is that there was a change in appearance and also that heat was involved to break the chemical bonds and form new ones as well.


Last but not least is to react two compounds.So what do we do? First, we place sodium chloride solution in a test-tube to a depth of about 2 cm and then using a dropper, add lead (II) nitrate solution slowly to the test-tube. you will observe that white precipitate formed.


So what exactly can we conclude from this experiment? We now know how the different compounds are formed. :D

10th Practical Lesson: 1P11 Investigating Mixtures and Compunds

Another Science Practical lesson worth waiting for. Today, we will be exploring compounds and mixtures and of course experimenting with them.


That day, we had some food for thought before we started to gather our apparatus.

  • Both sulfur and iron are elements
  • When they are mixed, a mixture of iron and sulfur is formed.
  • When they are heated together, a compound, iron sulfide is formed
The apparatus we need for the 1st experiment are tripod stand, evaporating dish, glass rod, wire gauze and Bunsen Burner. The materials we require include sulfur powder, iron fillings, filter paper, a piece of paper and a magnet.

We had to place the sulfur powder on a piece of filter paper and observe and describe its appearance. From what I could see, I noted that the sulfur powder is yellow in colour. We then had to wrap one end of the magnet with a piece of paper and observe if the sulfur powder is attracted to the magnet. However, due to the fact that it is not a metal at all, it definitely cannot be attracted by the magnet.

Next, we had to pour some iron fillings on an evaporating dish and observe its appearance which is obviously grey powder and also whether it can be attracted by a magnet. It could be attracted by a magnet due to the fact that it is made up of iron which can be attracted by a magnet and it is a magnetic material.

Following that, we had to mix the two elements together which will give us a mixture. The mixture is yellowish grey with specks of yellow powder. When you put the magnet near to the mixture, what will happen? Well, the magnet will only attract the iron fillings but will not attract the sulfur powder.

The last step is for us to make a compound. How so? First, we had to heat the evaporating dish over the Bunsen Burner until no more changes occur. We had to allow the evaporating dish to cool down. Then, we observed the compound formed and describe its appearances. This time, it became a black solid which was quite interesting and cool too. When we held the magnet close to the compound, it only attracted some of the compound. We found it interesting and asked ourselves why and it was due to the fact that some of the iron fillings properties were lost during the heating process and thus the magnet could only attract some of the compound.

From these experiments, we can conclude that a mixture retains the properties of its constituents while a compound does not. We also had to plot a table and these were the results.

I hope there can be more of such experiments on these interesting compounds and mixtures in the future. :D

Tuesday, 29 March 2011

9th Practical Lesson: 1P10 Brownian Motion

We also did another practical on the 29th of March as we were facing a lack of time and therefore, we did two practicals on the same day.


First, I will give a brief introduction of the Brownian Motion. It is named after the Scottish botanist Robert Brown who first observed it in 1827. He was using a microscope to look at pollen grains in water when he noticed that the grains kept moving about. At first he thought the pollen was alive but when he boiled it in water and tried again, the pollen grains still moved and Brown was unable to explain it. This was how the Brownian Motion came about.


This time, due to time constraints, we could not perform the experiment ourselves but the teacher will give a demonstration. Our teacher, Mr Low showed us the Brownian Motion using the projector. the Brownian Motion was shown using smoke put in a smoke cell and with bright light shone through the smoke cell and viewed under a microscope, the smoke particles could be seen as white dots moving about in constant random motion.


What exactly causes the bright spots or smoke particles to move then? This is because the air particles which cannot be seen bombard unevenly on all sides of the smoke particles, causing the random and constant motion. 


What about if the temperature of the smoke cell is increased? That will cause the smoke particles or bright spots to move faster as there is more kinetic energy due to higher temperature. Also, how can we differentiate between the larger or the smaller particles? We can differentiate them due to the fact that larger particles move around slower compared to smaller particles.


Another parallel of the experiment is to suspend pollen grains or talcum powder in water and observe the movements under a light source or a powerful microscope.


I have learnt a lot on the topic of Brownian Motion and how it occurs today and I hope that there can be more of such experiments where we can come into contact with such natural phenomenon.

8th Practical Lesson: 1P9 Density of an Irregular Object

Yay, yet another exciting science practical lesson and today, we will be exploring how to find the density of an irregular solid! B)

First, we had to listen to our LSS teacher, Mr Low, who gave us instructions on how to perform the experiment. We listened attentively and gathered the necessary apparatus for the experiment:
  1. Measuring cylinder
  2. Tissue paper
  3. Electronic beam balance
  4. A glass stopper
  5. String
  6. Scissors
Next, we had to follow the procedures and make sure that the experiment runs smoothly. Firstly, we had to weigh the glass stopper to determine its mass, M. Next,we need to pour water into the measuring cylinder to about one-third of its depth. Then, we have to note the volume reading, V1.


The following step is to tie the glass stopper with a piece of string and lower it gently into the water and not its volume reading V2. Therefore, the volume of the glass stopper is equal to (V2 - V1). After that, we also have to repeat the experiment with different starting volumes.


We had to plot our results into a table and compare the results of the few experiments we have conducted with different volumes. By recording the answers on a table, we can easily compare the volume of the glass stopper and confirm if the glass stopper is really the volume which we measured in the 1st experiment or are there some mistakes which will be identified by comparing the results of the 3 experiments.


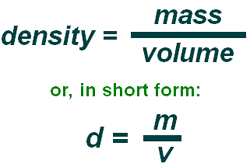
Also, we had to find the density of the glass stopper which was the formula we learned the previous practical, finding the density can be represented like this:
This is the formula in which we use to calculate density and we found that the density of our glass stopper is 2250kg/cubic metre. We also learnt about the 2 precautions when handling a measuring cylinder which is crucial for us to use a measuring cylinder properly.

There were also some questions for us to answer and they needed for you to apply the concept of density so that you can get the answer.

This Science Practical lesson was quite enriching and I look forward to the next Science Practical lesson. :D


Tuesday, 22 March 2011

7th Practical Lesson: 1P8 Density of a Regular Solid

Another practical lesson and today, we will be finding out how to calculate the density of a regular solid.

As usual, we had to gather our apparatus first:

  1. Micrometer screw gauge
  2. Electronic beam balance
  3. Small plastic bottle
  4. 5 glass marbles
Next, we had to read the instructions and follow them carefully. We had to weigh the plastic bottle first to determine its mass, m1. Then, we had to place all 5 marbles into the plastic bottle and weigh again, recording the mass as m2. Lastly, we had to measure the diameter of one of the glass marbles from 2 different positions using the micrometer screw gauge. We recorded our findings onto the worksheet and from there, we subtracted m1 from m2 and got the mass of the marbles. To find the volume of the marble, we must apply the formula for finding the volume of a sphere:

We used this formula and found the volume of 1 marble. Next, we divided the mass of the marble with the volume of a marble to find density.

With that, we could find the density of a marble.

I learnt quite a few things in this practical, and that includes the formula of volume of spheres and also the formula to calculate density. I still have a lot to learn and I look forward to the next Science Practical lesson.


Friday, 18 March 2011

Naked Number Catastrophe

I was doing some IT work for my Science lesson when I came across this article:


After a nine month trip to Mars, the Mars Climate Observer spacecraft was lost as a result of Naked Numbers.  Numbers communicated from Lockheed Martin in Colorado to NASA's Jet Propulsion Lab in California were left unit-less.  Naked numbers, being completely meaningless, left engineers to guess at their meaning.  The confusion created by improperly dressed numbers caused the loss of a $125 million spacecraft and the waste of a 9 month journey to Mars.  Thankfully, no lives were lost.

Lockheed Martin was sending daily course adjustments to the Jet Propulsion Laboratory with numbers that should have been wearing the English units of "pound-seconds" to describe the amount of impulse which should be applied to the spacecraft to adjust its course.  When these naked numbers arrived at the Jet Propulsion Laboratory engineers assumed that these were specifying the amount of impulse in metric units of "newton-seconds".  Simply labeling the units that were being used would have prevented this tremendous loss.  A group of physics teachers in Ithaca, New York hope to bring a proposal to Capitol Hill that would ban the use of naked numbers in the United States.  Further efforts are being used to convince the United Nations to apply a similar law to the World.  Until such a law is passed, physics teachers everywhere will have to settle for simply marking answers as wrong if they are not labeled with proper units.  Math teachers are urged to contribute to the solution not the problem.
 This article I found interesting as it applies to our daily lives as well. When we are doing our problem sums for mathematics everyday, we have to remember to write down units. The importance of these units are demonstrated in this article above. Without this units, we will not be able to accurately comprehend and do things. Only with this units can we function properly and base our calculations and finding on these units.


Due to the fact that we in Singapore are not using "Naked" numbers, and we are forced to write down the units, after some time, you will find that it has become a habit and you will not find it troublesome to write down units which many have as a misconception of a waste of time. I think that these units can make a very big difference as it may make a difference between life and death in certain situations.


I hope that one day, these numbers will be "dressed up" properly with the units required and I think it is time we start not to take units for granted! :D


Wednesday, 2 March 2011

6th Practical Lesson: 1P7 Measurement of Time - Pendulum

Today, we had another Science Practical lesson and I could say that I learnt quite a bit from this practical.


First, we started off as usual with gathering our apparatus: 

  1. 120 cm thread
  2. Pendulum bob
  3. Meter rule
  4. Split cork
  5. Stopwatch
  6. Clamps retort stand
Next, we had to read the instructions and follow them to make sure that nothing wrong happens. We had to fix one end of the bob, clamp the other end and firmly between the split cork, making pendulum of length 100 cm. We then had to give the bob a small displacement of about 10 degrees and set it into oscillation. We had to time the period of each oscillation using a stopwatch.

The next experiment was to decrease the length of the string holding the bob by 10 cm each time and observe if there were any differences. The period for 10 oscillations with the decreased length was shorter of course and we had to record our readings down.


After that, we had to plot a graph observing the timing of the periods with the decreasing length.


From this experiment, I learnt quite a few terms like oscillation, period and also tried a split cork for the first time. This Practical lesson was quite interesting and it taught me much too. I am looking forward to the next practical lesson!


Monday, 28 February 2011

Term 1 Test Reflections

The term 1 test results are out and sadly, the results are not as good as I expected.

This time, I got 27.5/40 for my Science test. This was a B3 and it was not a very good start for the year's tests. That score was just half a mark away from an A2 but I don't think I deserved an A2.

In this test, I did fairly well for the MCQ section, scoring 12/15. My score should have been 14/15 but due to the fact that I inverted the answers for Q1 and Q2, which was supposed to be 'D' and 'A' respectively but I put it as 'A' and 'D' respectively instead. This was an extremely careless mistake on my part otherwise I could have gotten better grades.

Also, I did not study in detail for this test, resulting in this kind of results. I did not do well for Section B, especially the question which required us to draw a graph. Not being very clear on how to draw a graph, I got the whole question wrong!! This was a mistake not to be made on my part.

For my next test, I indeed have to study harder and score better grades so time to study!!


Wednesday, 16 February 2011

5th Practical Lesson: 1P6 Measurement of Length

16/2/11
Another practical lesson as usual and this time, it was about the measurement of length. I know, I know the topic sounds boring and old and you were willing to bet that it involved a meter rule. Well, you were right but that was not all we used...We also used the two tools seen. They are the vernier calipers and the micrometer screw gauge.


First, We started off with gathering our apparatus. Namely:

  1. Meter rule
  2. Vernier Calipers
  3. Micrometer screw gauge
  4. Small beaker (50ml)
  5. Ball bearing
  6. Short piece of thick wire
With this done, we then proceeded on to conducting the procedure itself. We were first supposed to examine the meter rule and find its smallest reading. After that, we were tasked to find the height of our seat from 4 different positions and then find the average height itself. 


The next experiment was to get the vernier calipers and check for the smallest reading and also the zero error of the vernier calipers. This is to make sure that we do not have any mistakes in our measurements. Next, we had to measure the internal diameter of the beaker at 3 different positions, likewise for the external diameter. We then compiled the data into a table where the results could be seen and a conclusion could be made easily.


Next was the experiment using a micrometer screw gauge. We had to use the micrometer screw gauge to measure the diameters of the wire and the ball bearing. We had to repeat the measuring 3 times. From there, we could get the average results and also make a conclusion from there.


The next step was to compare our findings with our hypotheses. In this experiment, there was no hypotheses to make as there was no question to answer. 


That step unnecessary, we proceeded to answer some questions posed by our teacher. The first question was to ask what instruments we would use to measure accurately the diameter and thickness of the coin. Next question came the one where we had to apply the knowledge and use it to create a procedure to measure the diameter of a long piece of wire without using a micrometer screw gauge.


Answer: 


     "Wrap the long wire along the length of the glass rod making sure that there are no gaps in between each turn. Count the number of turns along the length of the glass rod. Measure the length of the glass rod. Measure the length of the glass rod with the meter rule. Divide the length of the glass rod by the number of turns of the long wire along the glass rod. The thickness and the diameter can thus be obtained."


This answer was not what I expected it to be and the question expected us to think out of the box in order to find a solution for the problem.


This practical was fun and interesting and it taught me a lot more about what we can think about to solve problems.


Wednesday, 2 February 2011

4th Practical Lesson: 1P5 Observations and Recording Part 2

2/2/11
Yet another practical lesson which we looked forward to. Today, we would be continue from where we left off from last week. We would be doing experiments and of course observing and recording the results. The first experiment was to use the thermometer and we were all excited and eager to get on with it.
Of course being as I was, a cautious person, I awaited instructions from my LSS teacher, Mr Low, who was back from re-service. He gave us instructions on what to do for the experiment and some things to take note of.We were to set up an experiment to heat water.
We then had to record our findings in a table so as to compile the information and then we can look through and analyse the data more easily. Also, we can make a conclusion from the data and prove if our hypotheses is right. In the end, I came up with a graph and proved my hypotheses of there being impurities in the water resulting in the temperature of the water rising to 101.5 degrees Celsius before remaining constant, signifying that 101.5 degrees Celsius is its boiling point.

We had to draw a best fit graph and I am not very skillful at drawing graphs, thus I may have to practise more. I still think that the water from the tap, is still clean but is "dirty" to some extent. This is due to the fact that there are some minerals present in the water. Maybe I could find out how this water is purified. I am looking forward to the next practical lesson!